Pages

Showing posts with label DIY. Show all posts

Wednesday, May 28, 2014

Newspaper Basket

Hello my friends,

On my last post I promissed to share a special craft I was creating for the teacher appreciation week. I do apologise for not posting it earlier, but my little son was ill and I did not have the chance to do anything. Thank God he is better and I can share my project.

First of all, I would like to share a few pictures of my little one :), he is 11 months old now. Time flies!!!!


He loves potato, broccoli and carrot puree :).


Love those legs up in the air when we take walks to the park :). That's what we call chilling!!!!!


Back to my special project :). I made a super awesome basket from newspaper. I was searching on google ideas of how to make a homemade basket and found this amazing idea. It is very simple and easy to make, and the result is fantastic!!!
I found a video on youtube that explains really well how to make it.  Here is the link of how to assemble the basket: https://www.youtube.com/watch?v=a_pmSdCGnAU


I filled the basket with homemade baking goods. I made bread, cookies and apple sauce. My son wrote a card and we put the paper flowers we created (the previous post explains how to make the flowers).

We gave the gift to three teachers and they all loved it, they found everything wonderful, specially the basket.


I personally loved the idea of making a basket from newspaper because it is totally unique, creative, personal and helps to save the planet. These baskets could be used for any type of gift, for example: Easter basket hunt, Halloween trick or treat, or for Mother's/Father's day. You could fill it with baking goods or beauty products or whatever you find appropriate. The basket usage is infinite.

Hope this post inspired you :). Have a great week!

Thanks,
Fabiana


Wednesday, March 12, 2014

Dressing up

 Hello my friends,

Spring is just around the corner and I am very excited. The weather is becoming better in Chicago, which gives me a lot of motivation to exercise :).

As I expressed many times before, my son loves dressing up and playing super heroes. This weekend I made a Batman costume out of construction paper. We both had a lot of creating it, and he looked very handsome :).


Another thing that I did last week was to bake a cake. There is a baking website called Sweetapolita which is fantastic. I tried her recipes many times before and it always taste deliciously perfect. The recipe for the cake below is called perfectly delightful vanilla cake. I made the cake for a potluck and I received great positive feedback. They loved the taste and the decoration of the cake, which is something I am thriving to achieve. This recipe is easy to make and assemble; when you make it please let me know your thoughts.


 On Monday we had a homemade sushi night. I enjoyed making and eating, it tasted great.


As I said in my previous post I am working on decorating my sons room, which I finally finished. I wanted to do a nautical theme but on a budged. 


The most laborious decorating in the room was to paint the walls. The actual painting as it were was not so difficult but measuring the lines was time consuming However, the end result was fantastic.


I also gave a complete makeover to one of our chest of drawer to complete the nautical theme. It had a very boring brown color, and I painted it with nautical blue color. It looks like a brand new chest of drawer. When I remembered to take the picture, I had already painted one of the drawers hence the reason the old one has a missing drawer. With old drawers you may have to change the tracks as my husband did to make the drawer opening and closing smoother.


I bought a set of pictures from Etsy, framed and hung them above the chest of drawers.


I am very happy with the result of the room and my son really loves it, and my hubby was quite happy that it did not cost much :).

Have a great week ahead :). Thanks.

Fabiana


Sunday, February 23, 2014

Smoothies and more

Hello my friends :),

Winter in Chicago has been extremely cold. Although, I am from a part of Brazil that has cold winters; I have never in my life experienced -27 degrees Celsius, which was -57F. When my family in Brazil asked me to described how cold it was, I could not find words to explain the level coldness here. However, we are surviving (rsrsrs). We are trying to do as much as we can to entertain ourselves indoors, and sometimes we play Ninja as an option (rsrsrs).


Since I gained a lot of weight with my second baby, I have a lot to loose. The cold winter is not helping much with outdoor exercises, hence I am focusing on my diet, trying to eat as many vegetables as I can. I make a smoothie, which is super delicious and nutritious, and I also give it to my baby, who loves it. Every time I make it,  he eats all of it.

My little baby is 7 months old and he is already eating solid food. With my first baby I pureed all his vegetables and fruits, I never bought pureed food at the supermarket. With my first son this was also the case, I am determined to do the same with my second one. I believe that making your own food is cheaper, healthier and my children will most probably eat vegetables. My oldest is already proving to me that I was right as he loves salads and vegetables. Thank God my kids eat well and whatever I give them they eat.

The recipe is:
1 orange
1 banana
5 strawberries
5 blackberries
5 raspberries
1 handful of spinach
2 leaves of kale
2 leaves of collard green

After blending it I add a tablespoon of Chia seeds, which helps to balance your blood sugar, has omega 3, gives you energy for the day, and has anti-oxidants that helps to loose weight. It does not taste like anything. I also do not give the chia seeds to my baby. So, every day I drink about 1 cup of this delicious super healthy smoothie at lunch time as well as my baby. Sometimes I put rice pudding to make it thicker for my baby. 


 There is always a happy baby every time he eats his green food.


Furthermore, I have been decorating the house. The other day my son helped me to paint tomato sauce tins with chalkboard paint to organise his study room. We also painted a board to stick the tins onto. My husband drilled the nails through the tins onto the board to make it secure, and after he screwed in the wall.


My son organized his pencils, rulers, scissors, crayons, markers, colored pencils, pens and erasers into the tins. As my son is bilingual, Portuguese and English,  I labelled the tins in Portuguese.


 His desk is painted with chalkboard paint too. We hung the tin organizer above the desk. It looked super cute and it is a great way to recycle.


Lately, my son is very much interested in making scientific experiments. He has a few books from the "Times for Kids" which is completed with interesting facts and experiments for the kids to learn. This week he wanted to make a "blubler". Blubbler is a thick layer of fat that insulates animals in Winter. This experiment is very easy to make as well as easy to comprehend as a concept.
What you need:
vegetable shortening
2 ziplock bags
a bowl of ice water with ice cubes

Directions:
1 - Put vegetable shortening into one ziplock bag until its one third filled.


2 - Turn the other ziplock bag inside out. Place it inside the bag filled with shortening, and spread out the shortening evenly. The shortening  should be trapped between the two bags like a layer of blubber.

3 - Put your hand into the inside out bag.

4 - Put your bare hand into the ice water to feel how cold it is. Then put your blubber mitten into the ice water.


Questions to ask:
Does the water seem colder with the mitten hand or bare hand?
Will you explain the meaning of blubber?
Can you give me examples of animals that have a layer of fat to keep themselves warm?

Thanks for reading my blog, I really appreciate your support.

Love,
Fabiana

Tuesday, December 18, 2012

Utensil Holder

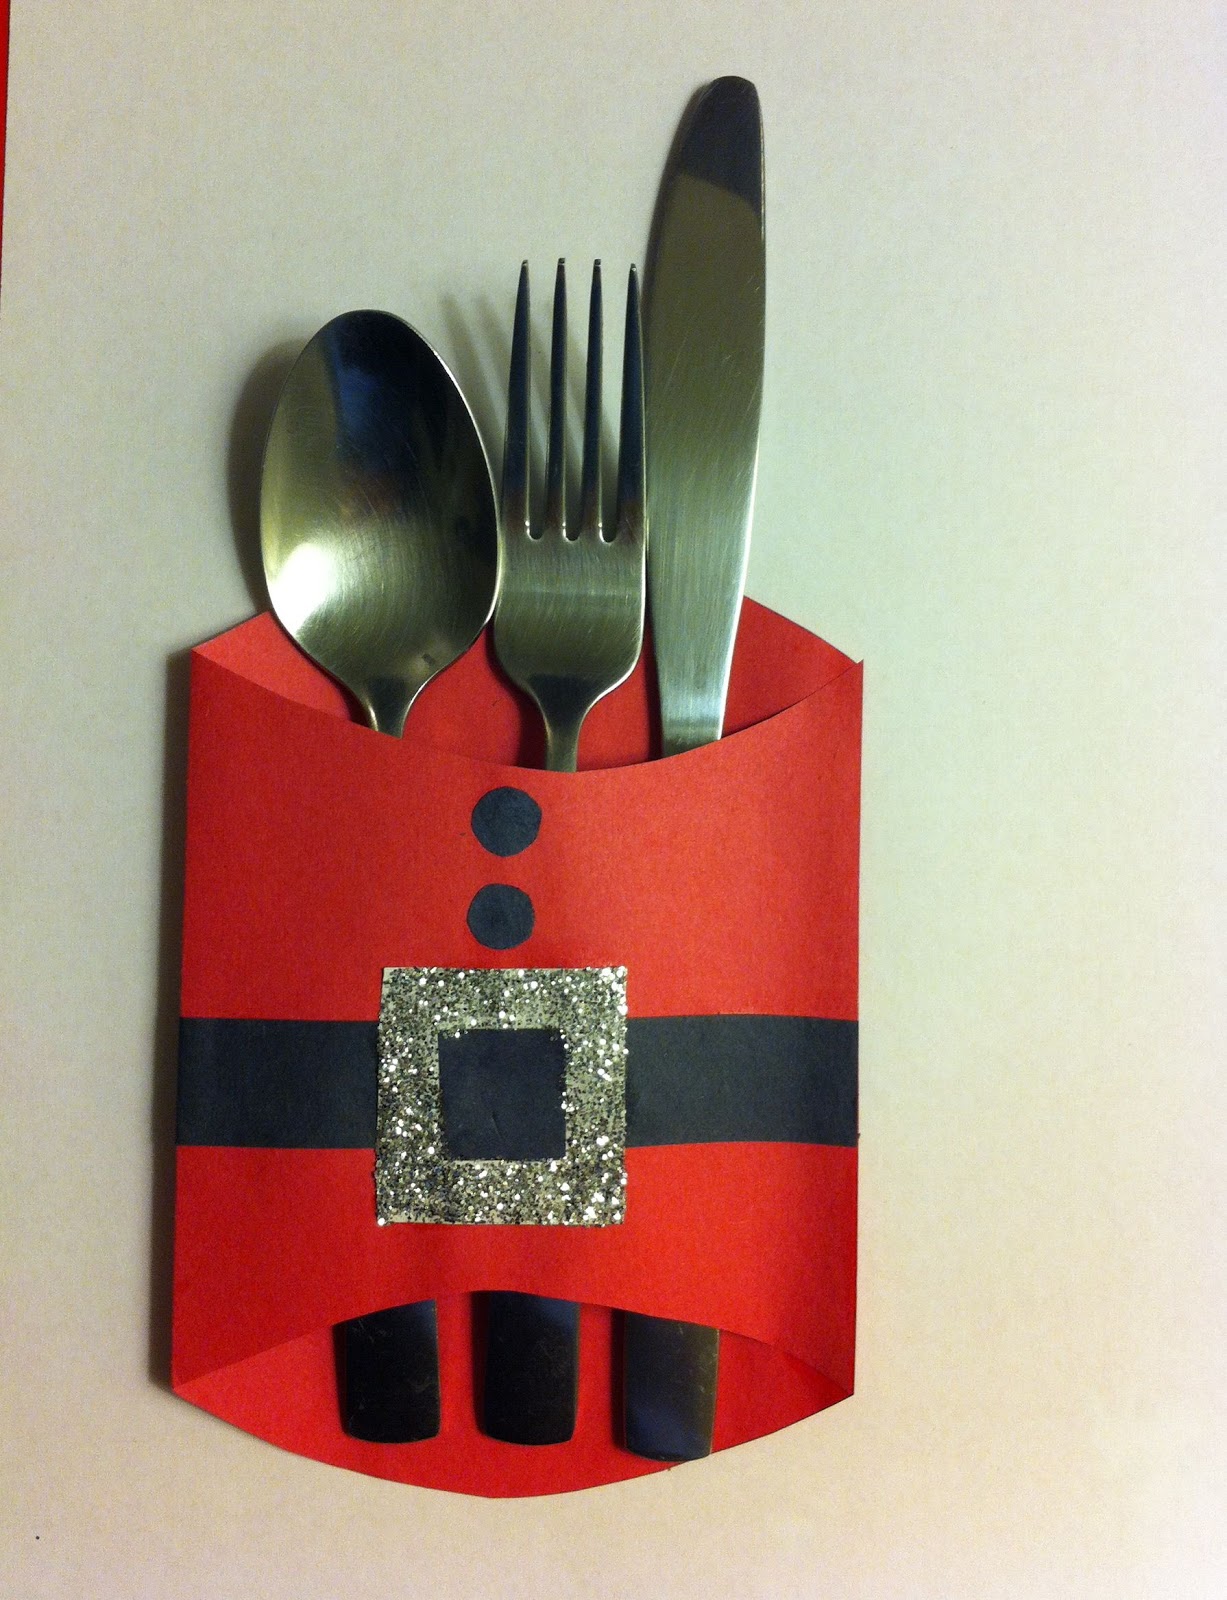
I was searching on Pinterest for Christmas decoration and I found a cute utensil holder on Stamp with Heather. She used a pillow box to create the utensil holder, as I did not  have one, I tried to create it using construction paper, and it actually worked quite well :))). If you would like to see her model please follow the link:
http://stampwithheather.typepad.com/stamp_with_heather/2011/12/utensil-holders-for-christmas-dinner.html

To design my version I used the following materials:
-red, black, white and green construction paper
-glitter
-glue
-scissors

Instructions:

1st: Cut the red construction paper in a vase form about 6 inches long x 6.5 inches wide (bottom part) x 3.5 inches (neck of the vase) x 5 inches (top of the vase). I made half red and half green.


2nd step: Turn the paper on the side and fold the edges.


3rd step: Cut the black construction paper in stripes about 1 inch wide, and then glue onto the red paper.


4th step: Cut the white construction paper in squares about 1.5 inches. Then glue onto the white paper a 3/4 of a inch square black construction paper to make the buckle. Afterwards, put glue around the white paper and put silver glitter.


5th step: Cut small circles of black construction and glue two of them onto each holder to make the bottoms.


6th step: Your utensil holder is ready to be used :))). I think it looks adorable, can't wait to set the table to see how they will appear :))).


Hope you felt inspired for your Christmas table decoration :). Thanks!!!

Fabiana

Monday, August 20, 2012

Batman Party

Last week I posted many ideas of the things I was designing for my son's party. The party was yesterday and it was a success. I was really proud of the party because my husband and I, and our precious friends did everything at home.

It was our first time baking and decorating a birthday cake, and  it turned out to be perfect, it was so delicious and moist. I took the recipe from Sweetapolita website, I highly recommend it, the cakes are super delicious and easy to make - http://sweetapolita.com/.

I would like to share pictures of the party in case you need some inspiration for your little one's party. The theme of the party was Batman inviting his superhero friends to celebrate his 5th birthday. All the kids looked cute in their costumes, there were batman, princess, spiderman, pirate, superman, and many more. It was delightful to watch the kids enjoying themselves.


I also prepared a table provided with materials for the kids to make their own masks and capes. As well as another table with colouring papers for the kids to entertaining themselves. I do apologise for not showing any pictures, but I was so busy making sure everyone was happy that I completely forgot. The images below are examples of some of the colouring pages I provided to the kids.


I would love to hear from you, please ask questions, or give any suggestions or comments about the party. I would really appreciate it, and I hope this post inspire you with ideas for your party.

Batman party favour

I designed a really cute Batman party favour which I would like to share with you. I simply used paper bags, glue, string, black construction paper to make the cape, and a printed child Batman face, a thank you message, and a Batman logo to glue onto the Batman cape.


Instructions:


1st step: Glue the thank you message onto the bag and fold it forward approximately 3 inches.


2nd step: Glue the cape facing the back of the paper. The cape is 9 inches in height, fold 1 inch and glue just this much onto to the folded paper. We did not stick the rest of the cape onto the paper to give a nice effect that Batman's cape is flowing in the wind. 


3rd: Afterwards glue the child Batman face onto the folded paper, leaving the ears out of the paper.


4th step: Make two holes on the paper to attach the string.


5th step: Put the favours in the bag and tie the string on each side of the hole. Then it is done and you are ready to enjoy the party :))))!!!!


Thursday, August 16, 2012

Batman box

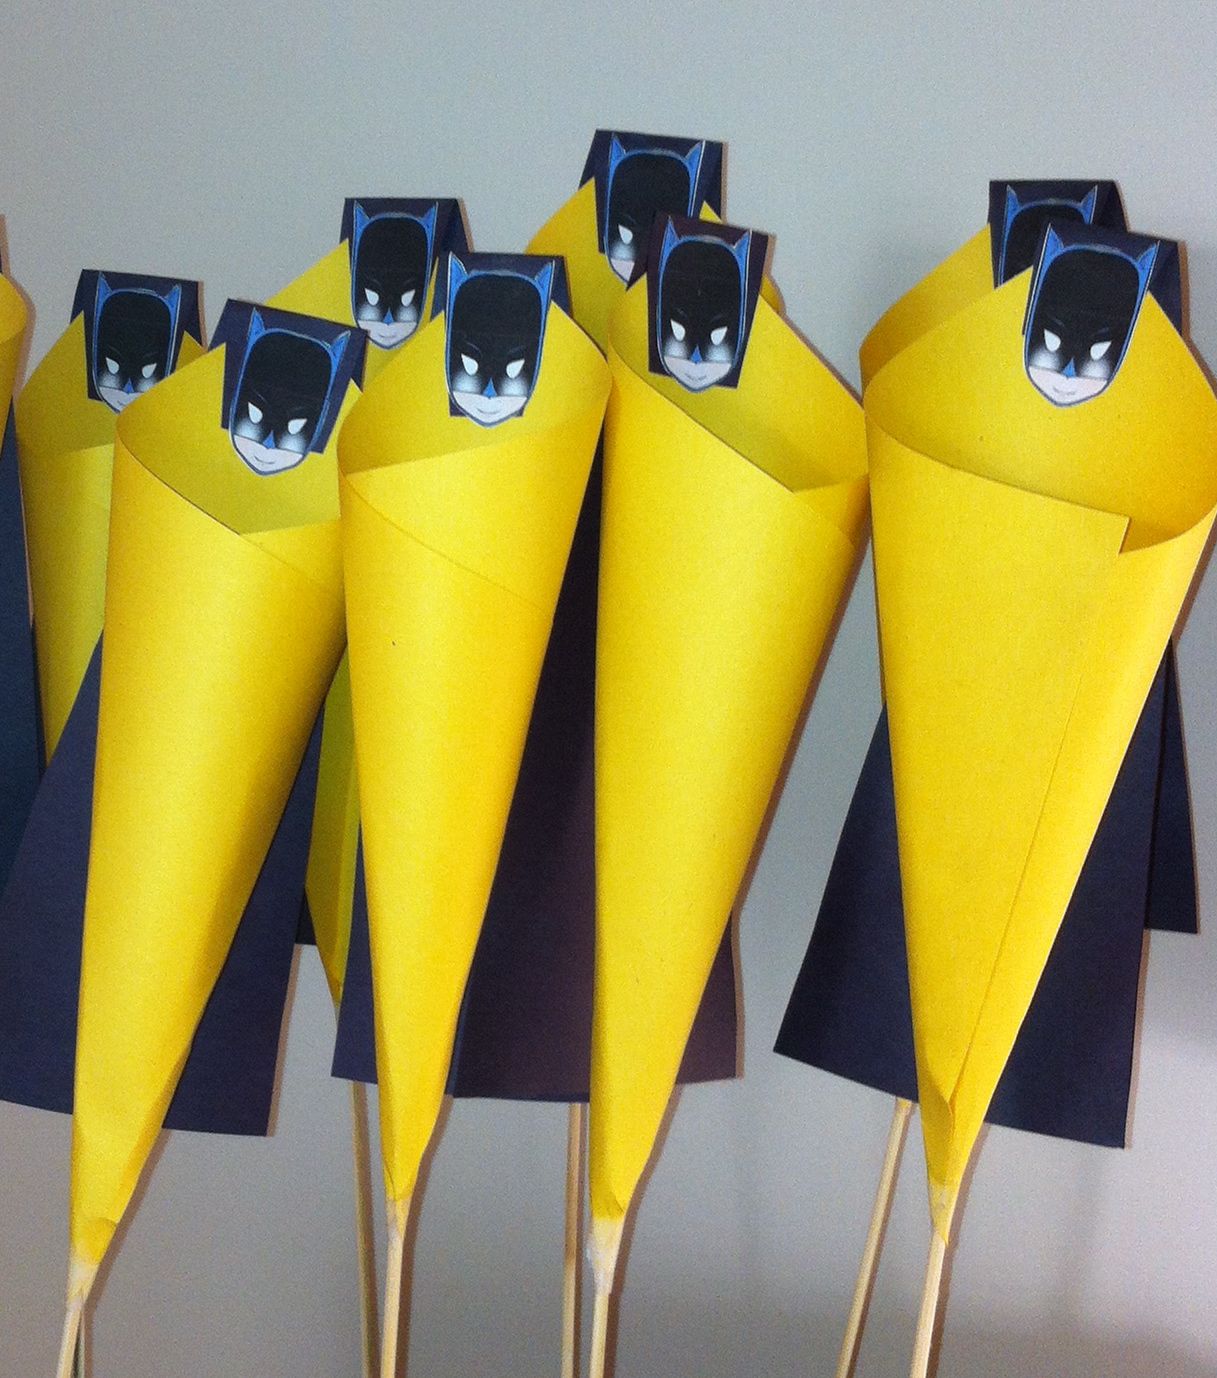
Another inspirational website I resourced was The Party Dress, a great website full of brilliant ideas. In this website I took the idea to create the Batman box and the cones for the desert table. The link for their page is the following: http://www.thepartydress.net/2011/04/batman-a-superhero-birthday-party/

The following images illustrate the way the cones and Batman box looked.


I think it looked great :))))!!! Brilliant idea indeed!!!! Let me know what you think please!!!!!

Flying Lollipop Superhero

This week I have been quite busy organising and decorating things for my son's party. There is a website called Little Bit Funky which I resourced to obtain some inspiration for the decoration of the party. There was a post suggesting a crafter-Superhero valentine which I adapted to my son's party. The following link is their version of the craft:  http://www.littlebitfunky.com/2012/01/20-minute-crafter-superhero-valentines.html -

The idea of the craft is to create flying superheroes using lollipops. All you need is lollipops, construction paper, string, Zap! sign, your choice of superhero logo, a box, and glue.

The pictures below show our flying lollipop superheroes.


After gluing the cape and the Zap! sign onto the lollipop and made small holes on the box and stuck the lollipops. 


I absolutely loved this idea, and I think it looked adorable. I believe the kids will love it. If you have any questions or suggestions please inform me. Have a great day. Thanks. Fabiana.