Pages

Friday, June 29, 2012

Exploding ziploc bags

I found on Pinterest a great science activity to experiment with the kids on All things beautiful blog -
 http://homeschooljournal-bergblog.blogspot.com/2011/07/summer-fun-43-fizzy-explosion-bags.html.


The ingredients for this experience are baking soda, vinegar, paper towel or toilet paper, measuring spoons, ziploc bags and water.


When I told my son that we would mix baking soda and vinegar he immediately got very excited because he remembered our experience with the volcano, which I posted on Jun 6th. He explained to his  sweetheart friend, who was at our house, what happens when we mix these two products; with a big jump and excitement he said: "It explodes!!!!!!!"


Procedure:


1 - We used toilet paper instead of paper towel, and teared it into a rectangle shape, measuring about 15 inches, and folded it in half. Then we put 1 1/2 tablespoons of baking soda in the center of the paper, and folded it nicely into a small square, we prepared 5 of them.


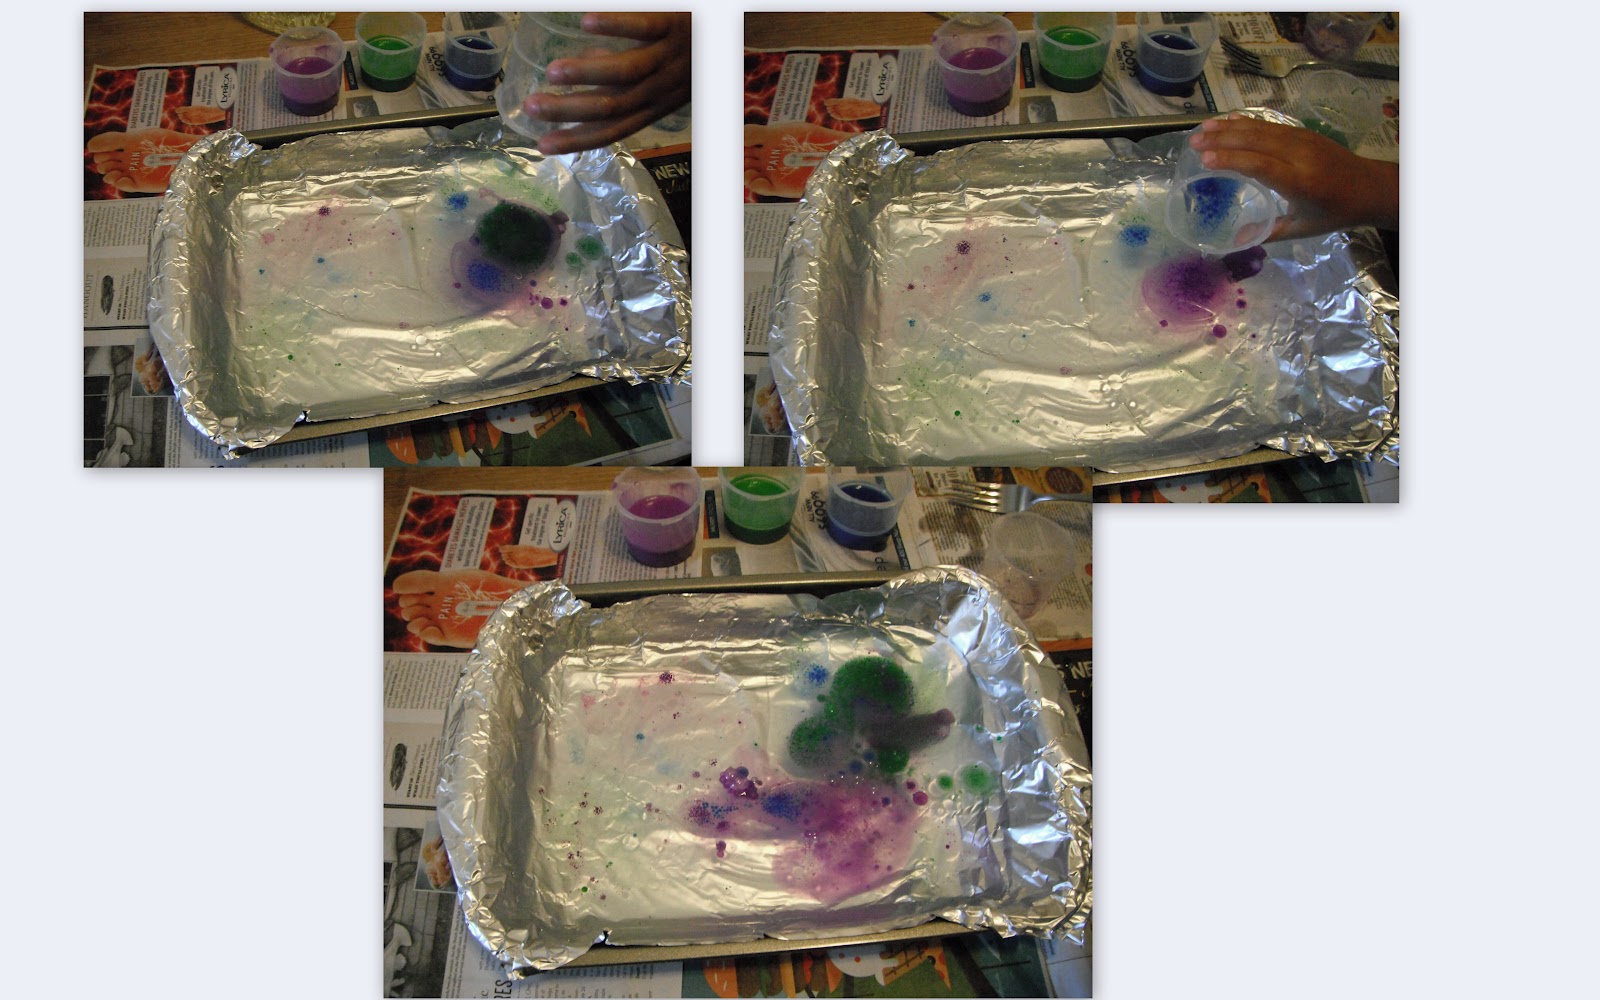
2 - Afterwards the kids poured into the bag 1/4 cup of warm water and 1/2 cup of vinegar. 


3 - The All things beautiful website suggested to drop the time-release packet into the vinegar and zip the bag closed before the fizzing gets out of control. You can zip the bag halfway closed, then stuff the packet in and zip the bag closed the rest of the way in a hurry, or you can put the time-release packet into the mouth of the bag and hold it up out of the vinegar by pinching the sides of the bag. Zip the bag closed and then let the packet drop into the vinegar. One way or another, get the packet in the vinegar and zip the bag closed. So we closed the bag almost completely and left just a small space to fit the stuffing bag. Then I put it into the bag and held it before letting it mix with the vinegar and water mixture. 


4 - Following we shook the bag, put it on the floor and stepped back. As soon as the bag hit the floor it started to inflate and then exploded, making a pop sound. The kids loved that, all I could hear was the children giggling and saying WOW!!!!!!!!!!!!!!!


It was a great science experiment and the pop sound was so cheered!!!!!!! It is amazing how much they love the baking soda and vinegar mixture effect :), I guess what fascinates them most is the explosion. Its an unexpensive experiment that teaches whilst learning.


Thursday, June 28, 2012

Thanks

I would like to share this divine picture I took this morning whilst I was running. God is so marvellous to have created wonderful things so that we can appreciate and enjoy. Scenarios like this always make me feel so invigorate and fulfilled with God's love. I thank God for my husband, my son, my family and friends, as well as for us being healthy and happy, and our awesome nature. I also would like to share a Bible quote that my son learnt at church school last Sunday and kept telling us every day this week. 

"Be kind and compassionate to one another, forgiving each other, just as in Christ God forgave you." Ephesians 4:32


Wednesday, June 27, 2012

Animals opposite flashcards


I designed a set of animals opposite flashcards that can be adapted to kindergarten and 1st grade, as well as ESL students.

The animal flashcards can be used when teaching opposites to the children, coupled with  introducing Animal species. The purpose for making the flashcards realistic in nature was to enable children to understand the lesson in a real context.

Another activity that I led using the flashcards and I humbly recommend is to ask the children to divide the cards into groups of mammals, reptiles, birds, insects, fish and amphibians. With the caveat that after repeat use they should know the animals in the compounded categories aforementioned and be able to parse the animals. I also wrote the name of the animals under the picture for spelling, writing and reading purposes.

If you download this activity will you please leave me a comment or suggestion :). 

I couldn't attach the file, I needed to post it using slides. If you would like a PDF or powerpoint version  please email me and send it to you.

Thanks.
Fabiana
fabilavina@gmail.com


Tuesday, June 26, 2012

Dominoes

In our house we enjoy playing dominoes. My son used to building blocks with dominoes, and today was the first time that we played the game properly. He was ready to play, and I didn't need to explain the game's rule many times, once was enough. 

He enjoyed it very much, we played it 6 times, I won once, he won 3 times and 2 others we couldn't continue as the game was blocked. He was very happy to win the game!!!!!!


It is a brilliant game that teaches mathematics, strategy and a great way to spend time with your children. We had a lot of fun and giggled all the time :)))))).

Oil Slick

Last week I checked the San Diego Zoo Kids website - http://kids.sandiegozoo.org/activities/oil-slick - and found out an interesting experiment called oil stick, which made me really curious and eager to try. The link aforementioned will lead you to this activity.


Materials: white construction paper, cooking oil, the website suggested food coloring, but I used painting because I didn't have it at home. It also suggested aluminium roasting pan, but I used a baking pan and covered it with aluminium foil. As well as measuring spoons, 3 plastic cups, fork, and newspaper to cover the table.


Procedure:

1 - I read the instructions to my son and he followed. The first step was to measure one tablespoon of oil and place it into each plastic cup.


2 - Measure 1 teaspoon of the 3 different painting colours or food colouring, and put each one into its cup with oil.


3 - Stir the mixture in each cup with the fork (wipe it off between colors) until the food coloring is well mixed.


4 - Fill the pan with water, but not all the way to the top.


5. Pour a little bit of one colored oil mixture onto one area of the pan. Then repeat this with the other two colors, on different areas of the pan. 


6 - My son got impressed with the bubbling oily colours, and he wanted to pour a bigger quantity to see the result, thus he poured all the mixture into the water.


7 - The website suggested to make an artwork laying a piece of construction paper on top of the water. After 30 seconds, carefully lift it off and see the effect of the colors on the paper. 


8 - My son and I weren't so impressed with the artwork, it definitely didn't turn up in the same way they showed on their website. Maybe it was the colours and painting that we used, I don't know, but we decided to try again by using more oil and painting. We basically doubled the recipe.


The second artwork looked better, but I am still not convinced. Nevertheless, we definitely enjoyed the experiment, specially my son. He liked it so much that he kept playing with it for extra 1 hour. He stirred the mixture with the fork and the measuring spoon, and then drew an Indian house and laid the construction paper onto the mixture. As the paper was blue, it didn't show the colourful oily bubbles, it was just an oily blue paper :(((((. But he wanted to analyse it and I didn't want to stop him!!!!!  I was quite pleased that he wanted to carry on playing and investigate what else he could get from this experiment. Afterwards, he put his hand in the oily water to fell it and he said to me: "Wow, look at my hands, it feels soft and oily"!!!! He kept playing with the plastic cups, the measure spoon and a bottle of water pouring the mixture in and out.


Even though the artwork didn't turn up the way I expected, I will definitely do this activity again, but this time I will use food colouring, instead of painting, and also the same colours as they used. 

I try always in the end of the activities I do with my son to know his thoughts. He told me that he liked this activity very much because there was explosions of oily colourful bubbles, and it was cool!!!! He also liked that the oil didn't mix with the water. I highly recommend this activity as it promotes curiosity  to experiment different things, learn about measurements and science. 


Monday, June 25, 2012

Tree

I cooked red kidney beans today with rice, beetroots and lettuce. Before serving the rice I designed a tree for my son. The lettuces were the leaves, the beetroots the fruits, which we called apples, and the trunk was the beans. He enjoyed it very much as this is his favourite food :)))))!!!!! Have a great day!!!!!

Fish

Last Friday I  taught the fish specie to my son. Instead of teaching him at home I choose to take him to visit the Shedd Aquarium - http://www.sheddaquarium.org. It was free admission at the aquarium last week, thus when we arrived, there was an immense queue. We waited for 2 hours in the line to get inside; the waiting was tiresome but as soon as we started explore, it was totally worth. We have been to most of the museums in Chicago, and the aquarium is on our top 5 list :)))))). I took many pictures but I selected the best ones, which I hope will demonstrate to you the beauty of this specie, and how much fun we had.

There are thousands of fish at the aquarium from all over the world: Amazon, Australia, Asia, central America, Africa, and so on. The following images exhibit spider crabs, octopus, crabs, lobsters, star fish, and many more.


We also saw piranhas, lungfish, paddlefish, and others.


The seahorses are very cute!!!!! The otters are great swimmers!!!!!!


We saw an electric eel (black one) and discovered that it generates up to 600 volts of electricity, whereas the humans are less than 1 volt. There was also a moray ell (yellowish one).
Furthermore, we learnt that the catfish travel the entire Amazon following network, and the biggest ever catfish caught was on the Amazon river, and it was approximately 10 feet high.
Below, there is a picture of an orange fish and my son's hand touching the glass, this fish was an interesting one :))))). He thought we were feeding him, he would open his mouth and touch the glass every time we put our finger there. My son was mesmerise with the fish, he said it was like the fish wanted to talk to us.
As well as many other types of exotic fish, we saw many turtles too.


One of the reasons I wanted to go to the aquarium was to be able to see the jellyfish. I think they are one of the most divine, although deadly, creatures in the entire sea life. It was sheer bliss to observe them.


What made it more magical was the peaceful room selected for those who desired to watch them. There was classical music playing in the background, the lights were low and the people were quite. It was like everyone was hypnotised by the jellyfish. The way they move is like in slow motion, giving you the chance to analyse every tiny movement made by them. I hope the pictures I took can show you how wonderfully beautiful they are.


I love corals, they are so beautiful and colourful.


My son enjoyed the fiercely sharks very much, he was looking forward to seeing them the whole day. They are enormous and very scary indeed, however, fascinating. 


There were also many types of rays at the aquarium, which you can see on the images below.


We all love the clownfish, hence here is a dedicated special space just for them :))))).


Although it was an aquarium, there were also some reptiles such as the iguana, chameleon, green frogs, and blue frogs, which I had not seen other than in photos. As well as the terrifying anaconda!!! This snake was massive, we couldn't see her face, just the body, which was very large.


We found some insects too. There was a big cockroach, and various giant ants.

My son was very excited and eager to know everything about the fish. Throughout our visit he asked me many questions about the food they eat, the way they breath, the position of the eyes, and many more. To be honest with you, I was absolutely pleased with our trip to the aquarium, because my son discovered everything by himself. He was very curious and didn't stop one second asking me questions. He was also searching on the computers they have available at the aquarium to find out more about this category.


I greatly recommend parents/teachers to take the children to visit the museum if they are able. It is extremely educational, and if they have studied this subject matter in books already, it will reinforce even more what they have learnt.  It is an unforgettable experience, where they learn science, marine biology, respect for the animals and humans too.

Friday, June 22, 2012

Bird Feeder

The focus of the our day was to learn about the birds category. I was babysitting my son's sweetheart friend and she studied with us; they are the same age. We checked the San Diego Zoo Kids website - http://kids.sandiegozoo.org/animals/birds - to study the different types of birds. Whilst we were learning about the birds' habitat, food and size, I also explicated that birds have wings and feathers and most of them fly, as well as lay eggs.

I wanted to create something really exciting for the kids to work together, therefore I decided to make a bird feeder. I used a 15 oz packing of bread crumbs, and I made a hole of 3 x 4 inches, and afterwards wrapped the red construction paper around.


Meanwhile, I sketched a bird on a white construction paper and asked the kids to paint it using their fingertip. They wanted to be little birds to protect the bird's house, so that's why they decided to write their  names on the paper and glued it onto their bird feeder.


Furthermore, the kids also wanted to decorate the back of the bird feeder. So they decided to draw themselves on a piece of paper, and glittered it, and then glued it onto the bird feeder. Likewise, they used the glitter to create the sun, cloud and the grass :)))). It looked cute, isn't it?!!!!!!


We glued the birds they drew in the front side of the bird feeder, and hanged it on the supporting pillar of the porch. The images bellow show our final bird feeder.


The following picture was the moment the kids were putting the bird seeds on the bird feeder. They were really excited at this moment :)))))!!!!!!


They really appreciated making the bird feeder, it was definitely the highlight of their day. Later on in the evening my son and I went to our friend's house for our weekly Bible study, and he told them that the best moment of his week was making the bird feeder :))))). It was indeed a brilliant artwork that was easy to design, promoted team work, encouraged the children to be creative, as well as learnt to be caring and loving with the birds.