Pages

Tuesday, July 31, 2012

Playing supermarket

Today my son and I played pretending supermarket to practice counting coins; I was the cashier and he was the customer. The grocery shop was quite small so we had a lot of time to converse :))))!!! I had empty boxes, bottles and cartons of products we find at the supermarket. I put the price tag and gave real coins to my son to pay for the things he would purchase. All the products were less than a dollar as I wanted him to practice recognition of coins as well as being able to count it to give the right amount of money.

My son loves playing pretending games as well as dressing up, thus he enjoyed this games very much. We played this game for approximately 1 hour and we both had a lot of fun. A great and educational game that can be performed with the products you have at home, which will enable them to learn how to count the coins and use it in a real life situation.


Monday, July 30, 2012

Twister

As we already know children need a lot of activities during the day to exercise their body and mind. I read a book called I love letters! by Jean Feldman and Holly Karapetkova, and found an amazing game to practice recognition of words. The book suggested to write letters on paper plates and place six to nine on the floor in order as shown below:
R B Y
I N Q
K W J

However, I reinvented the idea to adapt it to my son's level. My son recognises the letters of the alphabet very well, and now he is learning how to read and formulate sentences. Hence I decided to use words instead of letters to practice recognition of words.

The game is quite simple to play, the child has to follow the teacher/parents directions as you instruct s/he of what to do, for instance: "put your left hand on the word rat". Put you right elbow on the word zip. Put your right leg on the word pig, and so on. Make directions increasingly complex to make it funnier. My directions were:

  • Put your left hand on the word is;
  • Put your right leg on the word my;
  • Put your left leg on the word fan;
  • Put your right hand on the word men;
  • Put your left elbow on the word the;
  • Put your right knee on the word zip;
  • Put your right elbow on the word rat;
  • Put your left knee on the word pig;
  • Put you head on the word dog.


My son had a lot of fun trying to balance his body in order to reach the letters I was asking him to show me.


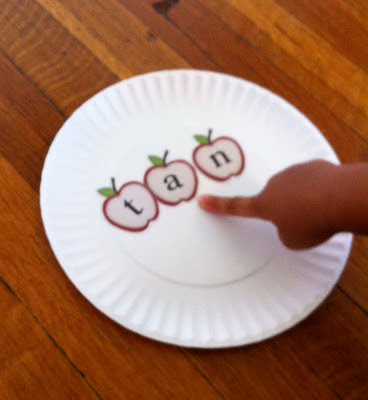
When we finished the game, he created two new words that he already learnt: dip and tan.


An inexpensive and fun game that develops words and sounds recognition.

Wednesday, July 25, 2012

Matching Pattern


I wanted to work with matching and identification of patterns with my son but could not find many activities available, thus I decided to design a few exercises for him to practice. I designed 5 sheets to correlate to each day of the week. Each day has a different theme: hat pattern, winter clothes pattern, transportation pattern, bugs pattern and reptile pattern. 
The aim of the exercise is for a child to color the following pictures in the exercise.
There are plenty of exercises to enable a child to practice sequencing of images. It is a great exercise for eye coordination.

The document is available on teacherspayteachers website, the following link directs to download the activity - http://www.teacherspayteachers.com/Product/Matching-Patterns

If you download these exercises please make a comment or suggestion. Thanks :))). 


Tuesday, July 24, 2012

Sink or Float

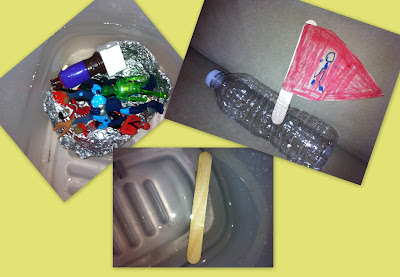
Today we worked with predicting whether or not an object would sink or float, as well as experimenting buoyancy. We conducted this observation with the following material: a transparent bucket filled with 1/3 of water. The objects we were observing were: a cork, coins, toys, a small container, a popsicle stick and aluminium foil.


Before starting the experiment I explained to my son that he was going to investigate whether the object sinks or floats. I also told him that the word sink means that the object goes downwards or breaks the  meniscus the surface of the water, because it is heavy. Floating or buoyancy, oversimplified means that the object stays on the surface, it doesn't sink (negative buoyancy); objects with less weight and a buoyancy friendly design (boat or water craft) tend to float. 


I explained to him that he was going to drop the objects into the bucket of water one by one so we could analyse. I expressed this before the object he designated was released, and he had to predict whether it would sink or float. The question I asked was:  Is it going to sink or float? Why? I wanted my son to think of the reasons for his answer hence why I asked him to tell me why. I expected him to tell me it would float because its light/or heavy.


The first thing he dropped in the bucket of water was the cork. He predicted that the object would float but could not explain why. Which begged the question, is the cork heavy or light? He answered light and I reinforced my point to him by saying that light objects float, heavy objects sink.


Afterwards he took the empty small container to investigate our first buoyancy experiment. I asked him to think of the following questions: 


  1. Do you think the container will float or sink?
  2. He said that it would float.
  1. What happens if you add coins to the container?
  2. He was very excited to try using coins. He firstly added 5 coins but it was still floating. He continued adding  more and more coins, until it finally sank which made him quite happy :)). I asked him to count how many coins he put into the container to make it sink, and the result was 47 coins. He had fun adding and counting the coins.


I took a piece of aluminium foil to pretend it was a ship and he placed a coin onto it to make his analysis. He answered correctly saying the coin would float when it was on the ship, however, it would sink when releasing it minus a flotation device on the water. I reminded him that metal materials are not designed to float, it may sink.

He also tried with his Batman toy. He was surprised to learn the Caped Crusader sank, and he told me that when we go to the beach we sink too if we go too far :))). 


He also analysed other materials such as the popsicle, many toys and a ship made with a bottle of water. He also put water inside the bottle which sunk immediately. 


This a great science activity that does not cost anything and it is quite enjoyable. It also develops the ability of predicting future events, as well as analytical thinking.


Monday, July 23, 2012

Batman party invitation


I was searching on the Internet to purchase Batman party invitations to invite my son’s friends for his 5th Birthday party. Although I found great invitations, none of them were what I was expecting to buy. Therefore I decided to create it and design it with the materials I have at home. I presented the first draft to my husband and he cooperated to improve the idea to something really amazing that made both of us proud. 

There were three things that we considered essential in our invitation: the Batman shadow, the "Pow" explosion effect, and the building skyline. My husband is a brilliant drawer, and his main duty was to sketch the Batman shadow and the "Pow" explosion effect. The Batman shadow was the hardest one to design, it took him 15 minutes to finish, but the result was perfect :)!!! The “Pow” explosion effect was easier and quick to finish. To make the building skyline I researched on Internet and found a card that had a skyline drawn, so I cut it and copied it, and made a few adjustments on my computer. 

I thought in sharing this idea with you all because I really think the invitation looked great, and we received great complements from our friends. I also thought in those who were looking for something unique, special and made with love could use our creation :))). I am really proud of this work as it was something my husband and I did together, and we put a lot of effort and love into designing this invitation.


Instructions:

1st step: Sketch the Batman shadow on a cardboard, preferable a cereal box, to make it easier to copy to the yellow construction paper. When finish copying it, cut it.


2nd step: Sketch and cut the “Pow” explosion effect. I made half of this with black construction paper, and half with yellow construction paper. 


3rd step: Glue the party details onto the “Pow” explosion effect. 


 In case you would like some inspiration for your party details, the image below is a sample of ours :))!!

Batman (name of the child) will be (age) years old and invites all his Marvel and DC Comic friends to join him for a heroes costume party on a super secret mission!!!!!!


The Bat time will be:
 (Day of the week), (Month) (Day of the Month) at (time) to (time)

And the Bat location:
(place and address where the party will be held)

                 Répondez s'il vous plaît RSVP  (Your telephone number)
We would really appreciate your confirmation by (Date).


4th step: Fold the ends of the blue construction paper meeting both edges in the middle.


5th step: Glue the details of the party on the inside part of the invitation.


6th step: Fold the ends of the blue construction paper again, meeting both ends in the middle. Afterwards glue the skyline on both sides. The blue paper works as the sky in this artwork, hence the skyline is not the same size as the sides of the blue paper.


6th step: Close the invitation with the sketched Batman shadow putting a little bit of glue on both edges and middle.


7th step: Distribute the invitations :))))!!!! The following picture is our final invitation.


Please inform me if you have any doubt, suggestion, or need any help. Thanks :)))!!!!

Thursday, July 19, 2012

Oobleck

Science is a fascinating and exciting subject and I enjoy experimenting in this subject matter with my son. I am always researching new scientific experiments and today I decided to do "Oobleck". All the websites I consulted  had wonderful reviews and it sounded quite fun.

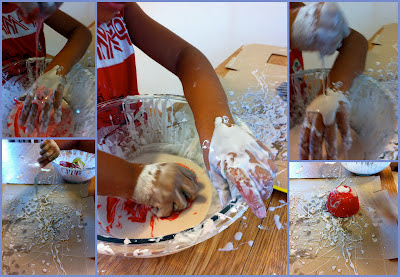
The recipe says you need just 1 cup of water and 2 cups of cornstarch, and food colouring. I wanted my son to explore this process as much as possible, thusly I provided a few kitchen utensils for him to play with it, and discover many different types of shapes and artwork he could obtain with the experiment. I also had an idea to take a cardboard box (cheerios box opened) and place it beside him to create a craft with the Oobleck.


My son put the water in the bowl and added 2 cups of cornstarch slowly, stirring it all the time.


The mixture became hard instantly as soon as we finished pouring the second cup of cornstarch. My son found it difficult to stir with the spoon and used his hands. I told him to play with it whilst describing me what it feels like. He said that it felt good to touch it and it was soft!!!!


Afterwards we added food colouring to the mixture. First we put 4 drops of the red colour and he mixed. Then we put the green colour and he mixed it as well. After mixing the green colour it disappeared and we obtained a light pink texture.


Furthermore he tried the kitchen utensils to make shapes from it. He managed to make inchworms with the masher, and he also made rain and spaghetti with the grater.


My son put the kitchen utensils aside and was really surprised how fast they dried, and  hardened almost instantly as he removed it from the Oobleck solutions.


Moreover, he got his hands in his art creation :)!!!. He added more food colouring, poured the mixture on his hands and onto the cardboard. He also used the spoon and the measuring cup to design an artwork.


I asked him to punch the Oobleck and it didn't move at all, it was super hard. Then the put his finger inside and told me it was like a volcano exploding when he took it off :)))!!!


We mixed more green and yellow food colouring and his creation began to look really beautiful. He enjoyed pouring it into the cardboard and make something out of the Oobleck.


After minutes creating the craft, he finally finished. The picture below shows his wonderful design :))).


We set the picture aside to show daddy when he would arrive from work. Nonetheless, my son couldn't contain his anxiety of touching it. Hence, I suggested him to smash it. I was so so pleased to observe my son using his imagination to play with the Oobleck. He was having a good time, playing for approximately 20 minutes as "Bob the Builder", as well as building roads and space rockets. He also didn't let me throw away the mixture when he finished playing as he wants to continue playing with it.


What a brilliant experience!!!!!! I asked many questions to my son to make him think about what he was doing, and his feeling about the experience. I also taught him about liquids and/or solids depending on the pressure applied. My approach to helping him learn is to comprehend the science behind this experiment which was by comparing action of punching and touching via punctures gently. When he punched the mixture it didn't move, it was as if he was hitting a wall, whereas when he touched it gently it was liquid. 

An amazing, inexpensive, educational and fun activity to experiment with your child. I highly recommend!!!!! Thanks :)))))


World wall

I finally finished our word wall and the picture bellow is a sample of how it looks like. I put it together last night and when my son woke up he was delighted with the pictures and told me it looked very beautiful. 


The words I have already introduce to my son and he knows how to write are: see, my, is, friend, the, I, name, look, at, me, cat, pig, dog, hat, bat, love, you, men, man and up.


These are some of the words I will work on: am, little, to, a, have, we, like, he, for, me, with, she, they, of, are, that, do, go, from, what, said, was,  where, come, one, two, three, four, five, six, seven, eight, nine, ten, red,  yellow, orange, blue, green, purple, white, brown, black, pink.


I always try to formulate a sentence every time I teach him a word, so he can also learn how to put it into context.


Bring to my awareness if you have any suggestion or word to add to my wall. Thanks!!!!


Wednesday, July 18, 2012

Rhyming words with phonetics

I have been researching extensively to discover efficient tools to teach my son how to read. I had begun working with him intensely to teach him how to utter the phonetic sounds of the alphabets. The following link is the song I play every day for my son with the intent for him to learn about phonics. This song is quite cute and very easy to learn: http://www.youtube.com/watch?v=xGpsVmWLRFA.
He often asks me the spelling of words, and instead of spelling the requested word, I ask him to repeat the word and think of the sounds he is making. He is becoming very good with recognition of words, and he is extremely proud of himself when he deciphers the name of the word he sought to understand :)).

I read in some teaching websites that the best way to teach your child to read is by not teaching them how to spell words, but to teach how to pronounce the sounds of the alphabets first. Once they are mastered in this matter, spelling becomes easier. Hence, the reason I am focusing on phonics a lot.

In addition, to the work we have been doing, I made a flip books to help him learn how to read. I made 4 books for the familiar words "at", "en", "og" and "an". I wrote the vowels in different colours to teach him awareness of the difference between vowels and consonants. I used construction paper and markers to make the flip books.

We worked with these books today and I was extremely delighted with the results; I highly recommend the use of my book.  I asked my son to pronounce the sound of each letter presented in the book, and repeat it as many times as he needed to be able to recognise the word he was saying. Working with rhyming words are important tools to develop the child's reading skills.


Instructions to make the flip books:

1 - To make the cover, take a construction paper and fold it in half making a rectangle shape. Then bring the endings together and fold it again.


2 - With the paper folded, cut a thin string on the side that is closed to divide the paper in half, and to make two covers.

3 - Meanwhile take a white construction paper and write just one word for example cat, and then just the first letter of the other words you would like to have. For instance "m" to make mat, "r" to make rat, "b" to make bat. I suggest to write the vowels with a different colour so the child can differentiate what is consonant and what is vowel. Afterwards glue the written word onto the cover book.


4 - The next step is to glue the top of the written letters on top of the first consonant of the word written.


5 - I also recommend to write the final word onto the cover page.


The words I used for my flip books were:
"at" - mat, rat, bat and cat.
"og" - log, fog, hog, frog and dog.
"an" - tan, man, can, fan and pan.
"en" -  ten, men, pen and hen.

I am also doing for words ending with "ig" (big, dig, pig and wig), "et" (jet, net, pet and wet), "ip" zip, dip, sip and rip), "ot" (dot, lot, pot and cot), and "ug" (bug, mug, rug and hug).


I found these flip books very useful and a great tool to make my child be familiar with reading. Once you explain and set the path they can do it on their own. It is something they can carry along in a long journey, or even just going to the supermarket. If you desire you may laminate it and bind the books to last longer. You may also add more letters to any group as you feel your child is progressing and ready to be introduced to new words. The words can become more complex as they grow and will develop their reading skills.

I also would like to recommend an incredible website that I used today to support his learning and add in support in the form of improvement in the process of being familiar with phonics. http://www.starfall.com/n/level-a/learn-to-read/load.htm?f

Let me know what you think about the aforementioned please :). If you have any questions feel free to ask as well.  Thanks :)))))!!!!

Monday, July 16, 2012

Counting coins

Hope you are all well!!! Last week I started introducing coins and their names to my son, and this week I want to focus on counting the coins. I would like to share useful websites that I used to teach him today . 


Every time I start teaching a new subject I like to play songs or show videos of the subject in context, as I noticed that my son learns a lot from it, specially the songs. Its so amazing how the kids can listen to a song just once and then start singing it afterwards; their ability to learn and memorise the words amazes me!!!!!!
I found two songs on youtube about counting coins that are quite nice. The link for the songs are below.


Songs:
http://www.youtube.com/watch?v=W2I9AlYp2zk
http://www.youtube.com/watch?v=Peqc252O1gE&feature=endscreen


Another brilliant website I recommend is called Cookie. Its an awesome website that contains many educational games involving languages, phonics, maths, science and many more. It is also fun, very well structured and kids love it. The following link is the counting coins games we played today.

Games:
http://www.cookie.com/kids/games/counting-coins.html


Following the songs and games, I gave to my son a money match exercise. The aim of the exercise was to count a combination of pennies, nickels, and dimes up to $1.00 on cards, and he needed to match it with the correct money match. 

The exercise is free and available on teacherspayteachers website:

http://www.teacherspayteachers.com/Product/Pennies-Nickels-and-Dimes-oh-my


The picture below is just a sample how it looks like.
This exercise works better for those who knows how to skip counting. I thought this was a great exercise and I will ask my son to do this activity again to help him to recognise the coins and develop his skip counting skills. 

Hope these information was useful :)! Let me know if you have any recommendations for counting coins for kindergarten students. Thanks :))))!!!


Saturday, July 14, 2012

Pennies

Kids love science and experimenting with different chemicals to discover the reaction. My kids love science and experimenting, and with that said today was not exception, we decided to clean our pennies with vinegar. This investigation is very easy and inexpensive to make coupled with being quite interesting. All you need is vinegar, pennies, lime, paper towels and a bowl. When I was a child my grandmother used to clean the burner drip pan and cap with vinegar and washing up liquid; she would leave it covered with the solution overnight. Vinegar is very powerful for cleaning and an excellent product to remove the burnt in grease from the burner drip.


The kids poured 1 cup of vinegar into the pot and squeezed lime drops, and then the pennies. The mixture of the coins with the solution began to make little bubbles.


We left the coins in the solution for approximately 1 hour and then we rinsed. Some coins were really shiny however some of the dirtiest ones didn't clean much, just superficially. 


This was one of the easiest science experiments we did. The kids liked it a lot. 


Thursday, July 12, 2012

Brazilian Cinnamon Raindrop Doughnuts

Today I would like to share a traditional recipe of one of the best delicatessen from Brazil. This recipe comes from many generations and was passed through the years by our great great grandparents. We called "cinnamon rain doughnuts" (bolinho de chuva) because they have a raindrop shape. As you drop spoonfuls of batter into the oil, little peaks form, which becomes delicious crunchy bits on he outside and amazingly soft on the inside of the doughnut (it makes my mouth watery just by writing it :)). As well as when it rains it is common in Brazil for our grandmothers, or aunties, or mothers to make this delicious doughnuts. I make it quite often at home and we had it today. Although it was a beautiful sunny day in Chicago :))), I still prepared it because it seems the weather will be this awesome for a long time - thank God!!!!! -  and I as craving it!!! My son and husband love it very much, and as every Thursday and Friday I take care of my son's sweet heart friend, she had the chance to have it too. She enjoyed it as well, she said that it was the best cinnamon doughnuts she ever had :)))))!!!! I liked that comment :)))!!!!

It is easy to make and perfect for a snack in the afternoon, it takes just 30 minutes and this recipe prepares around 25 rolls.


The ingredients are:


  • 2 eggs
  • 2 tablespoons of sugar
  • 1 cup of milk
  • 2 cups of flour approximately
  • 1 tablespoon baking powder
  • Sugar and cinnamon
  • Vegetable oil to cook the rolls


How to prepare:


  • Preheat the pan with enough oil to make the rolls floating. 
  • Mix all the ingredients until the dough is not too soft, not too hard. The key is to put the flour slowly, not at once, so you can verify when the dough is ready. 
  • When the oil is hot, start putting spoonfuls of dough into the hot oil. Lower the heat to make sure the rolls cook even, and won't be raw inside.
  • Prepare a plate with paper towels to absorb the oil.
  • Prepare another plate with cinnamon and sugar to pass it around the rolls.
  • Then prepare a cup of tea or coffee and ENJOY IT!!!! Its yummy!!!!


Let me know if you like it please :))).


Wednesday, July 11, 2012

Frog Life Cycle

The last animal species I taught to my son to finalise this chapter was Amphibians. I was babysitting my son's friend, so she joined the lesson with him. As we all love frogs I followed a brilliant idea of a craft of a frog life cycle on the DLTK website, which is one of my favorite websites for craft ideas -  http://www.dltk-kids.com/animals/mfroglifecycle.htm.

It is a simple, educational and fun activity and you just need paper plate, blue and green construction paper, aluminium foil, egg box cut to make just 4 eggs.

Instructions:

1 - To make the pod the kids used a paper plate and wrapped it with a blue construction paper. They glued the paper onto the plate and cut the edges to make it round.


2 - Afterwards they used foil and wrapped it around the paper plate to make it look like a pod.


3 - Then the kids made their own frog and tadpole with construction paper. They saw a model on the DKLT website and just attempted to copy by looking. It looked quite cute!!!


4 - Following, I printed the arrows template from the DKLT website, and asked them to write the directions of the frog life cycle on their blank arrows.


5 - To make the frog eggs we used an egg carton and painted with black marker on top.


6 - To put the items together, I read aloud the frog life cycle to them and they would stuck each item in order round the pond. 1 step: The eggs hatch into tadpoles; 2 step: The tadpoles grow into frogs; 3 step: the frogs lay eggs. I was really pleased with them because they would complete the cycle by themselves just by following what I was reading.


7 - Finally their frog life cycle was ready. My son had the carton egg, but his sweet friend wanted to make it using construction paper.


It was a very educational and easy activity. The children were able to read the life cycle based on what they wrote and listened to me explaining. They constantly repeating the cycle over and over again!! I was very happy with the result, it is one of those activities that makes one pleased  because the result is their understanding of the concepts in the lesson and very visible.